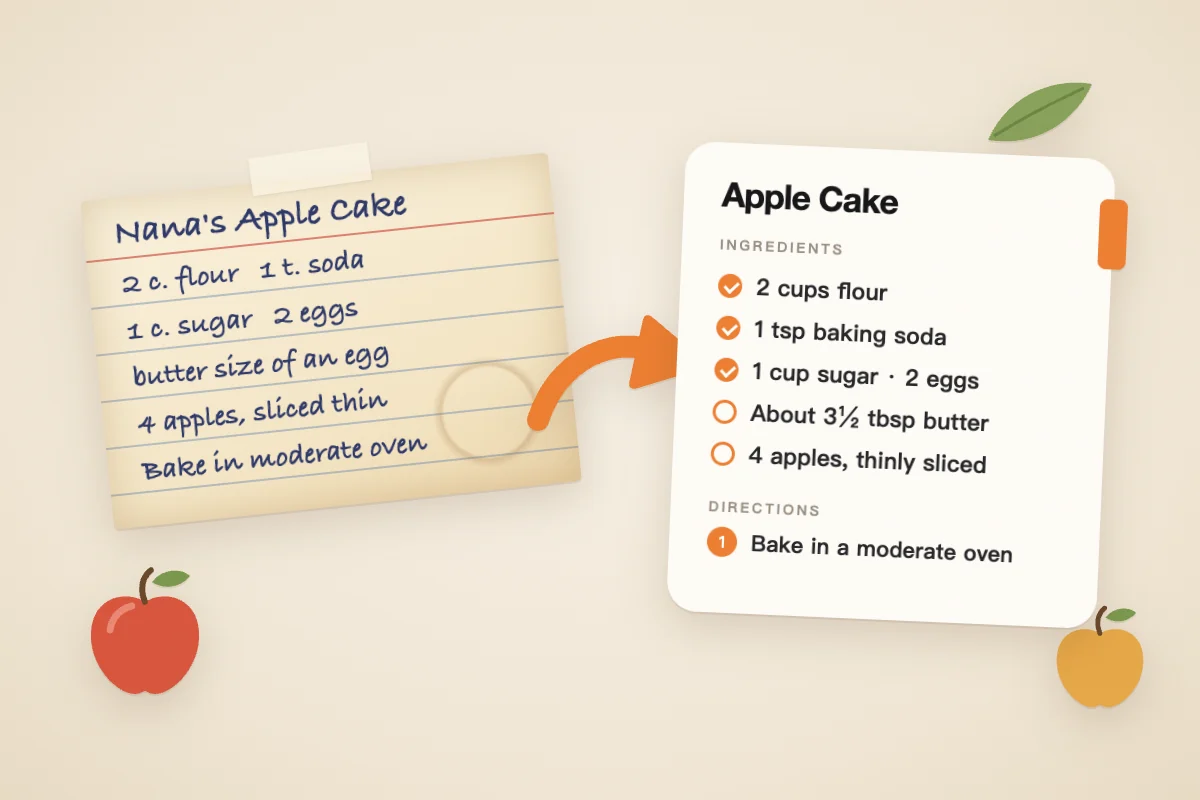
To digitize a handwritten recipe, photograph the card flat in daylight, import the photo into a recipe app that reads handwriting, then check every line against the card before you save it. Keep the photo of the original next to the typed version, and translate old shorthand — t. for teaspoon, T. for tablespoon, “a moderate oven” — carefully rather than by guesswork. The card itself goes back into a safe sleeve; the digital copy is the one that gets splattered.
A family recipe card is usually the only copy in existence. It’s been written in a hurry, corrected in pencil, and stained by the dish it describes. That’s what makes it worth keeping — and what makes it hard to cook from. You can’t search a shoebox of cards for “the one with the sour cream,” and you can’t text a card to a cousin who wants it for Thanksgiving. Digitizing solves both problems, as long as the conversion doesn’t quietly change the recipe along the way.
This guide covers the whole job: capturing the card, turning handwriting into an editable recipe, reading measurements your grandmother never had to explain, and passing the result around the family.
Photograph every card before you do anything else
The photo is your archive. Even if the handwriting import is perfect, you’ll want the original image later — to settle a family argument about “1 c.” versus “½ c.”, or just to see the handwriting. Photograph the whole card before you type a single line.
A phone camera is enough for most cards. What matters is the setup:
- Flat and square. Lay the card on a plain, dark surface and hold the phone directly above it, parallel to the card. Tilted photos squeeze the letters at the far edge, and that’s where amounts tend to be.
- Daylight, no flash. Shoot near a window. A flash bounces off glossy stains and pencil, which is exactly where faint writing disappears.
- Fill the frame, but keep the edges. Notes squeezed into margins and corners are common on well-used cards. Crop later, not in the camera.
- Both sides. Many cards continue on the back — “bake 1 hr, cool in pan.” Photograph the back even if it looks blank; faded pencil hides well.
Put the finished photos in one album, such as Family recipes, and name each one after the dish. That album is the backup you’ll return to.
Then protect the card itself. Resist laminating it: lamination seals paper between plastic with heat and adhesive, and preservation specialists describe it as damage that cannot be undone. A clear polyester sleeve protects a card from spills and can come off again without harm. The Library of Congress also recommends making copies of family documents and sharing them among relatives — which is exactly what a digital recipe lets you do.
Turn the handwriting into a recipe you can edit
A photo keeps the card safe, but you can’t scale it, search it or add it to a grocery list. For that, the handwriting needs to become text. In Hireci, the steps are the same as for any recipe image:
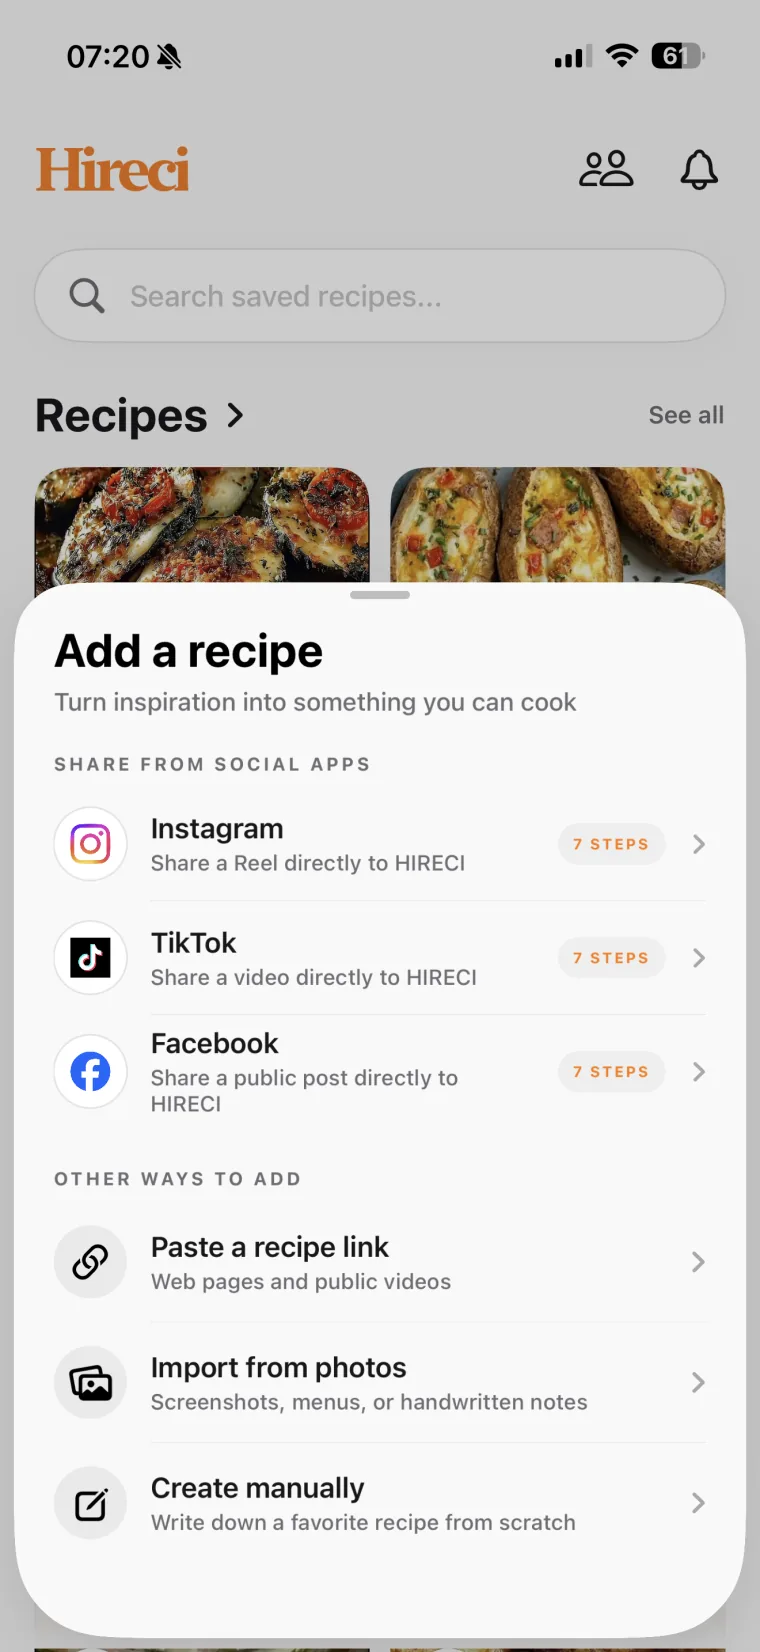
- Open Hireci, tap Add a recipe, then choose Import from photos — the option for screenshots, menus and handwritten notes.
- Pick the photo of one card and tap Analyze recipe.
- Open the new recipe and hold it next to the card. Compare the title, every ingredient line, and every step.
- Fix anything that came through wrong: open the … menu, choose Edit recipe, correct the text, and tap Save.
Handwriting is harder to read than print, for people and software alike. Neat block capitals usually come through well; looping cursive, pencil and ink that has soaked into a grease spot are where misreadings happen. Expect to type a few corrections, and don’t assume a line is right because it looks confident. Our screenshot recipe converter guide lists the characters that get confused most often — 1 and l, ½ and 1/2 — and they apply to cards too.
If a card is too faded to read at all, Create manually is the honest option. Type what you can read, and mark what you can’t, rather than letting an import fill the gap with its best guess.
Import one card per recipe. If the recipe continues on the back, add those lines with Add ingredient or Add step while you’re in Edit recipe, so the whole thing lives in one place. For the general routine of rescuing recipe images, see turning screenshots into recipes.
Decode the old shorthand before you trust it
This is where most family recipes go wrong after digitizing. The words transfer perfectly, but nobody knows what they meant. Older cooks wrote for people who had stood next to them in the kitchen. Here’s how to read the most common shorthand:
| On the card | What it usually means | What to write down |
|---|---|---|
| t. or tsp | Teaspoon | Spell out “teaspoon”; check the letter is really lowercase. |
| T. or Tbsp | Tablespoon — three times a teaspoon | Spell out “tablespoon.” A T misread as t cuts the amount to a third. |
| c. or C. | Cup | Spell out “cup.” |
| oleo | Margarine | Margarine, or butter if that’s what the family uses now — and a note saying so. |
| soda | Baking soda | “Baking soda,” so nobody reaches for baking powder. |
| Butter the size of an egg | Roughly the weight of one egg | A starting amount, marked as an estimate (see below). |
| Slow, moderate or hot oven | A heat level, not a number | The original wording, plus the temperature that worked when you tested it. |
| Few grains, a pinch | A very small amount, usually salt or spice | Keep it as written. Don’t invent a precise number. |
The abbreviations are standard: extension services still teach t. or tsp for teaspoon, T. or Tbsp for tablespoon and C for cup. The risk is in the handwriting: a small T and a capital T can look identical, especially when they’re scribbled. If a lowercase t in front of baking soda or salt looks like a lot, check the rest of the recipe for proportion before you decide. “Oleo” is short for oleomargarine, an older name for margarine.
“Butter the size of an egg” needs a little arithmetic. King Arthur Baking’s ingredient weight chart puts a large egg at about 50 grams without its shell, and 8 tablespoons of butter at 113 grams. That makes an egg’s worth of butter roughly 3½ tablespoons. Treat that as a starting point, not a translation — eggs and hands both varied — and adjust after you’ve made the recipe once.
Oven words are the trickiest. Fannie Farmer’s 1896 Boston Cooking-School Cook Book says bread “should be baked in a hot oven” and bakes its date bread for fifty minutes “in a moderate oven” — no number in either case. Modern guides translate the terms into ranges — roughly 250–325°F for a slow oven, 325–400°F for a moderate one and 400–450°F for a hot one — and even they note that the terms were never standardized. So keep the original words in the recipe, choose a temperature from a similar modern recipe, and write down the one that worked.
If you’re also changing the yield — doubling a cake for a holiday table, say — do the decoding first, then scale. Our guide to converting a recipe for more servings walks through the math.
Keep the notes, not just the numbers
The margins of a family card are often the best part: “double for Christmas,” “Dad likes it with less sugar,” “use the blue dish.” A conversion that keeps only ingredients and steps throws that away. Type those notes into the recipe as well, word for word, and add what you know about the card: who wrote it, roughly when, and who taught you to make it.
Name the recipe the way your family says it — “Nana’s apple cake,” not “apple cake 3” — so it’s the first thing that comes up when someone searches. If you’re building a larger collection, our guide to organizing saved recipes covers names, tags and duplicates.
Frequently asked questions
What is the best way to digitize handwritten recipes?
Photograph each card flat in daylight, then import the photo into a recipe app that can read handwriting and check the result against the card. Keep the photo as your archive and the typed version as the one you cook from. Spell out abbreviations and keep the writer’s notes as you go.
Can an app read cursive handwriting?
Often, but not reliably. Clear print usually converts well, while looping cursive, faint pencil and stained ink are misread more often. Always compare the converted recipe with the original card and correct it by hand. For a card that’s barely legible, typing the recipe yourself is faster than fixing a bad conversion.
Should I scan or photograph old recipe cards?
A phone photo is enough for most cards if you shoot straight down in even daylight without flash. A flatbed scanner gives more consistent results for fragile, faded or very small cards. Either way, capture both sides and keep the full card in the frame, margins included.
Should I throw away the original cards after digitizing?
No. The digital copy makes the recipe usable, but it doesn’t replace the handwriting, stains and notes on the card. Store originals flat in clear polyester sleeves or an archival box, and avoid lamination, which cannot be reversed.
What does “moderate oven” mean in an old recipe?
It describes a heat level rather than an exact temperature. Modern guides usually place a moderate oven somewhere between 325°F and 400°F, and the terms were never standardized. Keep the original wording, start from the temperature a similar modern recipe uses, and record what worked.